Sử dụng Laravel Mix với Webpack cho tất cả các assets
Laravel Mix cung cấp API để định dạng Webpack nhằm xây dựng các bước cho ứng dụng của bạn bằng rất nhiều pre-processors CSS & Javascript thông dụng.
Đây là định nghĩa lấy từ documentation. Nhưng ý nghĩa thực sự đằng sau đó là gì?
Laravel Mix
Laravel Mix được đặt trong các webpack configurations thông dụng và bạn có thể thêm nhiều configurations tùy chỉnh. Nếu bạn muốn sử dụng webpack thì cũng khá hay, nhưng thật ra configure webpack không hề dễ. Hoặc có thể các bạn muốn sử dụng ES2016 nhưng lại đọc phải rất nhiều bài phức tạp về loaders và modules.
Laravel Mix cho phép chúng ta sử dụng 1 line đơn để mô tả những gì bạn muốn và nó sẽ sử dụng các setting được preconfigure để xử lý 1 cách phù hợp.
Cài đăt Laravel Mix
Với Laravel
Nếu bạn đang sử dụng Laravel 5.4 trở về sau, thì mix đã được cài đặt. Tất cả những gì bạn phải làm là chạy npm install.
Standalone
Từ gốc ứng dụng của bạn, hãy chạy các commands sau:
npm init -y
npm install laravel-mix --save-dev
cp -r node_modules/laravel-mix/setup/webpack.mix.js ./
Trong file package.json hãy thêm đoạn sau:
    "scripts": {
        "dev": "NODE_ENV=development webpack --progress --hide-modules --config=node_modules/laravel-mix/setup/webpack.config.js",
        "watch": "NODE_ENV=development webpack --watch --progress --hide-modules --config=node_modules/laravel-mix/setup/webpack.config.js",
        "hot": "NODE_ENV=development webpack-dev-server --inline --hot --config=node_modules/laravel-mix/setup/webpack.config.js",
        "production": "NODE_ENV=production webpack --progress --hide-modules --config=node_modules/laravel-mix/setup/webpack.config.js"
    }
Cài đặt đã xong.
Configure Laravel Mix
Hầu hết thời gian chúng ta sẽ dồn vào file webpack.mix.js. Trong file này, bạn sẽ thấy như thế này:
    let mix = require('laravel-mix');

    /*
     |--------------------------------------------------------------------------
     | Mix Asset Management
     |--------------------------------------------------------------------------
     |
     | Mix provides a clean, fluent API for defining some Webpack build steps
     | for your Laravel application. By default, we are compiling the Sass
     | file for your application, as well as bundling up your JS files.
     |
     */

    mix.js('src/app.js', 'dist/')
       .sass('src/app.scss', 'dist/');
Nó đã được preconfigured để compile 1 file ở src/app.js vào file dist/app.js và src/app.scss đến dist/app.css.
Có rất nhiều methods Mix khác và bạn có thể thấy tất cả các methods đó trong file default webpack.mix.js
    // Full API
    // mix.js(src, output);
    // mix.react(src, output); <-- Identical to mix.js(), but registers React Babel compilation.
    // mix.extract(vendorLibs);
    // mix.sass(src, output);
    // mix.standaloneSass('src', output); <-- Faster, but isolated from Webpack.
    // mix.fastSass('src', output); <-- Alias for mix.standaloneSass().
    // mix.less(src, output);
    // mix.stylus(src, output);
    // mix.postCss(src, output, [require('postcss-some-plugin')()]);
    // mix.browserSync('my-site.dev');
    // mix.combine(files, destination);
    // mix.babel(files, destination); <-- Identical to mix.combine(), but also includes Babel compilation.
    // mix.copy(from, to);
    // mix.copyDirectory(fromDir, toDir);
    // mix.minify(file);
    // mix.sourceMaps(); // Enable sourcemaps
    // mix.version(); // Enable versioning.
    // mix.disableNotifications();
    // mix.setPublicPath('path/to/public');
    // mix.setResourceRoot('prefix/for/resource/locators');
    // mix.autoload({}); <-- Will be passed to Webpack's ProvidePlugin.
    // mix.webpackConfig({}); <-- Override webpack.config.js, without editing the file directly.
    // mix.then(function () {}) <-- Will be triggered each time Webpack finishes building.
    // mix.options({
    //   extractVueStyles: false, // Extract .vue component styling to file, rather than inline.
    //   processCssUrls: true, // Process/optimize relative stylesheet url()'s. Set to false, if you don't want them touched.
    //   purifyCss: false, // Remove unused CSS selectors.
    //   uglify: {}, // Uglify-specific options. https://webpack.github.io/docs/list-of-plugins.html#uglifyjsplugin
    //   postCss: [] // Post-CSS options: https://github.com/postcss/postcss/blob/master/docs/plugins.md
    // });
Với đoạn code này, bạn có thể gói gọn nhiều nhất có thể và không cần phải lo lắng về webpack build căn bản.
Hỗ trợ SASS, LESS, Stylus, PostCSS, PlainCss… Và tất cả những gì bạn phải viết là 1 line single.
Compiling
Sau khi configure ứng dụng của bạn, có rất nhiều commands mà chúng ta có thể chạy.
npm run dev
Việc này sẽ build assets của chúng ta những không minify hay produce 1 build trong trạng thái sẵn sàng cho production.
npm run watch
Tương tự với npm run dev nhưng phải xem chừng các thay đổi với các assets của bạn và tự động recompile bất kì asset nào có thay đổi
npm run hot
Sẽ không chỉ refresh page khi 1 mảnh Javascript được thay đổi, nhưng nó cũng sẽ duy trì trạng thái hiện tại của component trong hệ điều hành.
npm run production
Sẽ compile tất cả các assets của bạn và produce 1 build sẵn sàng cho production. npm run production sẽ chạy tất cả tasks Mix và minify output.
Demo cơ bản
Hãy tạo 1 giao diện HTML “hư cấu” đơn giản với vài CSS & JS. Chúng ta muốn folder structure như thế này:
    app/
    |__public/ #webroot
    |    |__js/  #folder for JS files
    |    |__css/  #folder for CSS files
    |    |__media/  #folder for images and other files
    |
    |__resorces/
    |    |__scripts/ #folder for our source JS files
    |    |__styles/ #folder for our source SASS files
    |
    |__src/ #folder we want copied "as is" to the public directory.
    |
    package.json
    webpack.mix.js
Vậy file webpack.mix.js của chúng ta sẽ như thế này:
    let mix = require('laravel-mix');
    mix .js('resources/scripts/app.js', 'public/js/app.js')
       .sass('resources/styles/app.scss', 'public/css/app.css')
       .copyDirectory('src', 'public');
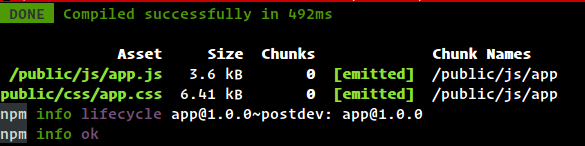
Trong ví dụ trên, chúng ta có 1 danh bạ public là nền tảng gốc. Chúng ta cũng có 1 file index.html sẽ là homepage của app.
Chúng ta muốn tất cả các files CSS sẽ nằm trong folder public/css. Hiện tại, chỉ có 1 file ở đó, là file app.css. Vì bạn đang sử dụng SASS, chúng ta sẽ sử dụng method sass() của Laravel Mix để compile file app.scss vào app.css. Chúng ta sẽ sử dụng file tương tự để compile resources/scripts/app.js của chúng ta vào public/js/app.js.
Source code có sẵn ở đây và 1 bản demo được hiển thị ở đây.
Một ví dụ nâng cao hơn
Với dự án khác, chúng ta sẽ build nhiều sites tĩnh với cùng codebase. Nhưng source files compile đến các danh mục khác nhau. Cấu trúc folder sẽ như thế này.
 app/
    |__public/ #webroot
    |    |__site1/
    |    |    |__js/  #folder for JS files
    |    |    |__css/  #folder for CSS files
    |    |    |__media/  #folder for images and other files
    |    |    |__index.html
    |    |
    |    |__site2/
    |         |__js/  #folder for JS files
    |         |__css/  #folder for CSS files
    |         |__media/  #folder for images and other files
    |    |    |__index.html
    |
    |__site1/
    |   |__scripts/ #folder for our source JS files
    |   |__styles/ #folder for our source SASS files
    |   |__src/ #folder we want copied "as is" to the webroot
    |        |__media/ #folder for images and other files
    |        |__index.html
    |
    |__site2/
    |   |__scripts/ #folder for our source JS files
    |   |__styles/ #folder for our source SASS files
    |   |__src/ #folder we want copied "as is" to the webroot
    |        |__media/ #folder for images and other files
    |        |__index.html
    |
    |__package.json
    |__webpack.mix.js
Vì thế, chúng ta sẽ configure webpack.mix.js bằng cách này.
   let mix = require('laravel-mix');
    mix .js('site1/scripts/app.js', 'public/site1/js/app.js')
    .sass('site1/styles/app.scss', 'public/site1/css/app.css')
    .copyDirectory('site1/src', 'public/site1')
    .js('site2/scripts/app.js', 'public/site2/js/app.js')
    .sass('site2/styles/app.scss', 'public/site2/css/app.css')
    .copyDirectory('site2/src', 'public/site2');
Vì cả 2 sites đều tương tự nhau và có cùng dependencies, thì thay vì có 1 setup riêng cho mỗi site, chúng ta có thể dùng Laravel Mix để compile chúng đến các folders khác nhau, từ đây chúng ta có thể set thành các web roots riêng biết cho các sites tương ứng.
Sử dụng method này sẽ ngăn việc sở hữu 2 dự án riêng biệt và phải cài đặt, duy trì cùng set dependencies trong cả 2 dự án.
Structure này rất giống với bản demo đầu tiên, nhưng vì Laravel Mix cho phép chúng ta set đích đến compile, chúng ta có thể dễ dàng compile đến các folder khác nhau, và từ các folder này chúng ta sẽ sử dụng như webroot.
Chúng ta sẽ đặt tất cả source code cho site1 trong folder app/site1/, và site2 trong app/site2/. Trong những folder này, chúng ta sẽ có folder scripts/ cho các file JavaScript và folder styles/ cho các files SASS. Folder src dùng cho các files mà chúng ta chỉ muốn sao chép đến webroot.
Webroot cho các sites sẽ lần lượt ở trong public/site1/ và public/site2/
Source code nằm ở đây . Trong này, tên của các sites sẽ là Imperium và JustOfada, được host ở đây (imperium) và ở đây (justofada).
Webpack nâng cao
Laravel Mix thực sự có 1 file webpack.config.js được preconfigure mà Laravel Mix tham chiếu khi nó chạy. Nếu cần phải thêm vài config tùy chỉnh, bạn có thể chuyển webpack configuration bổ sung đến method mix.webpackConfig()
Để tùy chỉnh hoàn toàn Webpack configuration, hãy sao chép file node_modules/laravel-mix/setup/webpack.config.js đến root directory của ứng dụng. Sau đó chỉnh sửa file package.json và đưa tất cả các tham chiếu --config đến file configuration được sao chép mới.
Ví dụ:
   "scripts": {
        "dev": "NODE_ENV=development webpack --progress --hide-modules --config=webpack.config.js",
        "watch": "NODE_ENV=development webpack --watch --progress --hide-modules --config=webpack.config.js",
        "hot": "NODE_ENV=development webpack-dev-server --inline --hot --config=webpack.config.js",
        "production": "NODE_ENV=production webpack --progress --hide-modules --config=webpack.config.js"
    }
Kết luận
Khi nhìn vào các demo, bạn sẽ rằng ra Laravel Mix đã tiết kiệm được của chúng ta rất nhiều thời gian. Bạn sẽ không cần lo lắng về webpack configurations. Nếu chưa từng sử dụng webpack trước đây thì đây sẽ là công cụ tuyệt vời để bạn bắt đầu. Còn nếu đã từng sử dụng webpack thì công cụ này sẽ làm đơn giản hóa toàn bộ quy trình.
Tham khảo thêm các việc làm Laravel lương cao cho bạn
- T Thoughtworks: Nơi công nghệ chạm đích đến
- Đ Đại dương xanh cho Doanh nghiệp tăng trưởng bền vững trên Zalo
- L Lakehouse Architecture: Nền tảng dữ liệu cho ứng dụng AI trong tương lai
- G Giải Quyết Bài Toán Kinh Doanh Bằng Big Data và AI
- B BenQ RD Series – Dòng Màn Hình Lập Trình 4k+ Đầu Tiên Trên Thế Giới
- F Framework nào tốt nhất cho dự án của bạn? – Checklist chi tiết
- K Kinh nghiệm xử lý responsive table hiệu quả
- S Stackoverflow là gì? Bí kíp tận dụng Stack Overflow hiệu quả
- 7 7 kinh nghiệm hữu ích khi làm việc với GIT trong dự án
- B Bài tập Python từ cơ bản đến nâng cao (có lời giải)