Streaming Media với Nginx và nginx-rtmp module
Lộ trình khá chi tiết Streaming server Media với Nginx và nginx-rtmp module.
1. Về nginx-rtmp module
Nginx-rtmp là module mở rộng, mà kết hợp với Nginx để cho phép xây dựng máy chủ streaming media.
Một số tính năng mà nginx-rtmp hỗ trợ:
- RTMP/HLS/MPEG-DASH live streaming
- RTMP Video on demand FLV/MP4, phát từ local file hoặc qua HTTP
- Stream relay support for distributed streaming: push & pull models
- Ghi streams vào nhiều tệp FLV
- Hỗ trợ H264/AAC
- Transcode trực tuyến với FFmpeg
- HTTP callbacks (publish/play/record/update etc)
- Module điều khiển HTTP để recording audio/video and dropping clients
- Kỹ thuật buffer tiên tiến để giữ cho bộ nhớ được cấp ở mức thấp nhất mà streaming vẫn nhanh.
- Kết hợp được với các ứng dụng như Wirecast, FMS, Wowza, JWPlayer, FlowPlayer, StrobeMediaPlayback, ffmpeg, avconv, rtmpdump, flvstreamer, ..
- Thống kê stream với định dạng XML/XSL
- Linux/FreeBSD/MacOS/Windows
Có thể bạn muốn xem thêm:
2. Cài đặt Nginx với module nginx-rtmp
Step1: Download & unpack latest stable nginx & nginx-rtmp version
cd /opt
sudo git clone git://github.com/arut/nginx-rtmp-module.git
sudo wget http://nginx.org/download/nginx-1.14.1.tar.gz
sudo tar xzf nginx-1.14.1.tar.gz
mv nginx-1.14.1 nginx
Step2: Build nginx với nginx-rtmp
sudo ./configure --prefix=/etc/nginx \
--pid-path=/var/run/nginx.pid \
--conf-path=/etc/nginx/nginx.conf \
--sbin-path=/usr/sbin/nginx \
--user=nginx \
--group=nginx \
--with-file-aio \
--with-http_ssl_module \
--add-module=nginx-rtmp-module
sudo make
sudo make install
Step3: Run Nginx với systemd
- Create tệp /lib/systemd/system/nginx.service với nội dung sau:
Description=nginx - high performance web server
Documentation=http://nginx.org/en/docs/
After=network-online.target remote-fs.target nss-lookup.target
Wants=network-online.target

[Service]
Type=forking
ExecStartPre=/usr/sbin/nginx -t -c /etc/nginx/nginx.conf
ExecStart=/usr/sbin/nginx -c /etc/nginx/nginx.conf
ExecReload=/bin/kill -s HUP $MAINPID
ExecStop=/bin/kill -s QUIT $MAINPID

[Install]
WantedBy=multi-user.target
- Start Nginx service
systemctl enable nginx.service
systemctl start nginx.service
3. VOD qua RTMP
Chúng ta sẽ cấu hình để cho phép các video player xem video qua giao thức RTMP.
3.1 Cấu hình Nginx
Step1: Tạo tệp tin cấu hình nginx với nội dung sau:
user  nginx;
worker_processes  1;
pid        /run/nginx.pid;
user nginx;

events {
    worker_connections  1024;
}
rtmp {
    server {
        listen 1935;
        chunk_size 4000;
        # video on demand for mp4 files
        application vod {
            play /var/mp4s;
        }
    }
}

http {
    access_log /var/log/nginx/access-streaming.log;
    error_log /var/log/nginx/error-streaming.log;
    server {
        listen      80;
        root /var/www/html;
        # RTMP statistics in XML
        location /stat {
            # Copy stat.xsl put to root directory
            rtmp_stat all;
            rtmp_stat_stylesheet stat.xsl;
        }
    }
}
Thông tin cấu hình tệp cấu như sau:
Khối rtmp { }
- listen port với 1935 (port default)
- application với đường dẫn ảo là vod
- Đường dẫn thư mục chứa các tệp video để phát là “/var/mp4s”.
Khi đó muốn sử dụng chúng ta truy cập kiểu như “rtmp://192.168.10.113:1935/vod/video-name.mp4”
Step2: Tạo thư mục chứa và copy tệp tin video
mkdir /var/mp4s
cd /var/mp4s
Chúng ta download hoặc copy một tin video vào thư mục /var/mp4s
3.2. Sử dụng Video Player để chạy video
Chúng ta có thể sử dụng một trình phát video có hỗ trợ giao thức rtmp để phát.
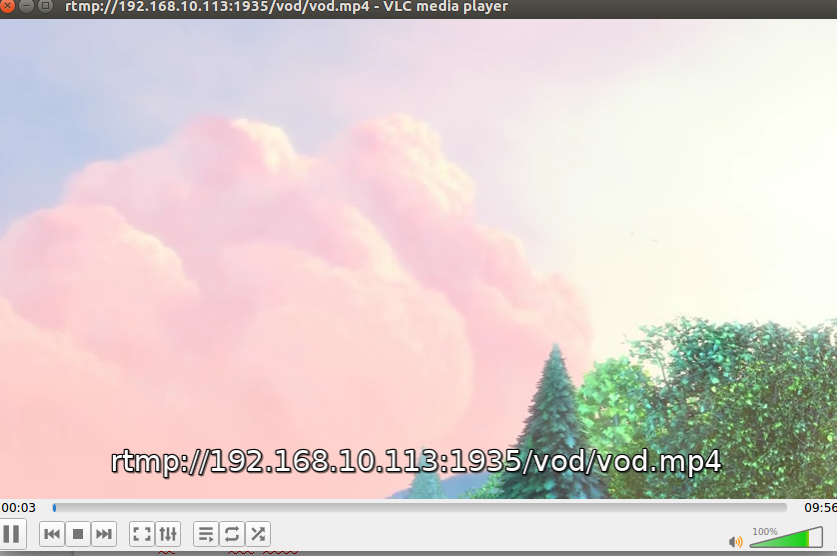
Ở đây, chúng ta có thể sử dụng VLC player
Mở player VLC → Nhấn Media → Chọn “Open Network Stream ..”. Sau đó vào thông tin đường dẫn tệp video vod với rtmp://192.168.10.113:1935/vod/vod.mp4
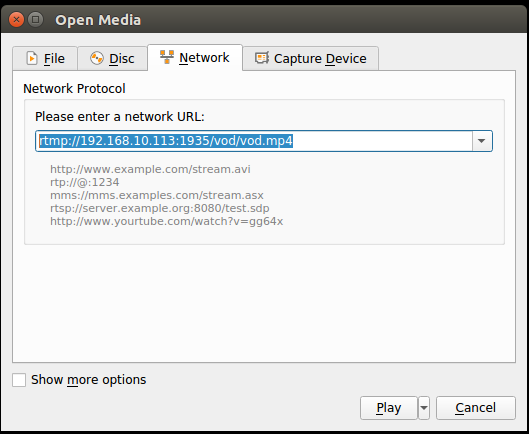
Cuối cùng nhấn Play để phát video.
4. VOD qua HLS
Chúng ta sẽ cấu hình để cho phép video player phát video qua giao thức HLS (Apple HTTP Live Streaming).
4.1 Cài đặt Ffmpeg
Sử dụng script Installing FFmpeg on Linux
Nếu chỉ sử dụng một thư viện có sẵn thì cài đặt đơn giản như sau trên CentOS
yum install ffmpeg ffmpeg-devel ffmpeg-libpostproc
Trong phần Giới thiệu FFmpeg, cũng đã giới thiệu và cách sử dụng cơ bản FFmpeg.
4.2 Convert tệp vod.mp4 sang HLS
Trước khi convert, chúng ta thực hiện copy/download tệp tin video lên server (ví dụ tệp tin là vod.mp4)
Sử dụng lệnh ffmpeg để convert vod.mp4 sang định dạng HLS (Apache HTTP Live Stream)
ffmpeg -i video.mp4 -profile:v baseline -level 3.0 -s 720x400 -start_number 0 -hls_time 10 -hls_list_size 0 -f hls /tmp/index.m3u8
Trong đó:
- vod.mp4 là tệp video đầu vào cần convert
- index.m3u8 là tệp tin master đầu ra của HLS playlist
- và một số tham số tùy chọn cho độ phân giải, thời gian phân đoạn, …
4.3 Cấu hình nginx
Ở đây, Chúng ta sẽ cấu hình nginx làm web server, đồng thời cấu hình làm media server.
user nginx;
worker_processes  1;
error_log  logs/rtmp_error.log debug;
pid        /var/run/nginx.pid;
events {
    worker_connections  1024;
}
http {
    #serve the player for HLS
    server {
        listen       80;
        root /var/www/html;
        server_name  localhost;
        location /hls {
            # CORS setup
            add_header 'Access-Control-Allow-Origin' '*' always;
            add_header 'Access-Control-Expose-Headers' 'Content-Length';
            # Allow CORS preflight requests
            if ($request_method = 'OPTIONS') {
                add_header 'Access-Control-Allow-Origin' '*';
                add_header 'Access-Control-Max-Age' 1728000;
                add_header 'Content-Type' 'text/plain charset=UTF-8';
                add_header 'Content-Length' 0;
                return 204;
            }
            types {
                application/vnd.apple.mpegurl m3u8;
                video/mp2t ts;
            }
            add_header Cache-Control no-cache;
            alias /tmp;
        }
    }
}
- Listen với port default 80
- URL của web server sẽ là http://192.168.10.113/; với root directory là /var/www/html
- URL của stream server sẽ là http://192.168.10.113/hls
- Playlist của stream là tệp tin m3u8, với các segment là tệp ts
- Đường dẫn thư mục chứa các playlist là /tmp
4.4 Phát video trên web browser với videojs
Chúng ta có thể phát video trên web browser, mà sử dụng flash player như Flowplayer hay Jwplayer. Trong trường hợp này, tôi sẽ giới thiệu sử dụng videojs player cho phát video trên web browser.
Link về videojs: https://github.com/videojs/http-streaming
Trên Nginx web server, chúng ta sẽ tạo tệp tin index.html với nội dung sau vào root directory:
<!DOCTYPE html>
<html>
<head>
<meta charset=utf-8 />
<title>Videojs-HLS embed</title>

  <!--

  Uses the latest versions of video.js and videojs-http-streaming.

  To use specific versions, please change the URLs to the form:

  <link href="https://unpkg.com/[email protected]/dist/video-js.css" rel="stylesheet">
  <script src="https://unpkg.com/[email protected]/dist/video.js"></script>
  <script src="https://unpkg.com/@videojs/[email protected]/dist/videojs-http-streaming.js"></script>

  -->

  <link href="https://unpkg.com/video.js/dist/video-js.css" rel="stylesheet">
<style>
.center {
    margin-left: auto;
    margin-right: auto;
    display: block
}
</style>
</head>
<body>
<!--  <h1>Video.js Example Embed</h1> -->

  <video-js id="my_video_1" class="vjs-default-skin center" controls preload="auto" width="720" height="400" poster="../images/bbb-poster.jpg">
    <source src="http://192.168.10.113/hls/index.m3u8" type="application/x-mpegURL">
  </video-js>

  <script src="https://unpkg.com/video.js/dist/video.js"></script>
  <script src="https://unpkg.com/@videojs/http-streaming/dist/videojs-http-streaming.js"></script>

  <script>
    var player = videojs('my_video_1');
  </script>

</body>
</html>
Trong tệp index.html chúng ta sẽ vào đường dẫn chứa tệp tin playlist mà đã convert ở Step2. Khi đó vào thông tin đường dẫn URL ở đây là: http://192.168.10.113/hls/index.m3u8
Cuối cùng duyệt http://192.168.10.113/index.html và xem kết quả

Chúng ta thấy videojs cho khung nhìn tuyệt đẹp.
5. Cấu hình Live Streaming
Live Streaming là tính năng chính của nginx-rtmp module, và quá trình thực hiện live streaming sẽ qua giao thức RTMP.
Các bước cho thực hiện quá trình Live Streaming như sau:
5.1 Cấu hình Nginx để làm live streaming server
Step1: Tạo tệp tin nginx.conf với nội dung sau
user nginx;
pid /var/run/nginx.pid;
events {
    worker_connections 1024;
}
#RTMP configuration
rtmp {
    server {
        listen 1935;

        application live {
            live on;
            # Push the stream to the local HLS application
            push rtmp://localhost:1935/hls;
        }

        application hls {
            live on;

            # Only accept publishing from localhost.
            allow publish 127.0.0.1;
            deny publish all;

            # Streams as HLS
            hls on;
            hls_path /tmp/hls;
            hls_fragment 3s;
            hls_nested on;
            hls_fragment_naming system;
        }
    }
}

#HTTP Configuration
http {
    sendfile off;
    tcp_nopush on;
    aio on;
    directio 512;
    default_type application/octet-stream;

    server {
        listen 80;
        root /var/www/html;
        server_name localhost;
        location /hls {
            # Disable cache
            add_header 'Cache-Control' 'no-cache';

            # CORS setup
            add_header 'Access-Control-Allow-Origin' '*' always;
            add_header 'Access-Control-Expose-Headers' 'Content-Length';

            # allow CORS preflight requests
            if ($request_method = 'OPTIONS') {
                add_header 'Access-Control-Allow-Origin' '*';
                add_header 'Access-Control-Max-Age' 1728000;
                add_header 'Content-Type' 'text/plain charset=UTF-8';
                add_header 'Content-Length' 0;
                return 204;
            }
            # MIME type for HLS
            types {
                application/dash+xml mpd;
                application/vnd.apple.mpegurl m3u8;
                video/mp2t ts;
            }

            alias /tmp/hls;
        }
        # RTMP statistics in XML
        location /stat {
            rtmp_stat all;
            rtmp_stat_stylesheet stat.xsl;
        }
    }
}
Ở đây, chúng ta sẽ cấu hình nginx làm nhiệm vụ là web server và live streaming server.
- Block http { } : Dựng nginx làm web server với mục đích thống kê số liệu, cho phép người dùng xem live streaming. Nếu không cần dùng các chức năng này, chúng ta có thể qua bỏ block này. Quá trình tạo server cho xem live streaming có thể thực hiện ở server khác.
- Block rtmp { } : Dựng nginx làm live streaming server, để thực hiện quá trình thu phát live streaming từ client và publish luồng
Diễn giải một số directive cho cấu hình nginx trên như sau:
- live on: Bật tính năng live stream.
- push rtmp://localhost:1935/hls : Thực hiện push streaming vào /hls
- allow publish 127.0.0.1; Khai báo server từ xa được phép push stream đến hệ thống. Ở đây chúng ta sẽ khai báo localhost được phép push stream đến hệ thống localhost. Kết hợp với
deny publish all, nhằm hạn chế remote server nào đó push stream vào hệ thống của mình. - deny publish all;
- hls on: Bật chế độ HLS, cho phép client có thể sử dụng chế độ này
- hls_path /tmp/hls: Thiết lập đường dẫn thư mục chứa playlist và fragments của HLS. Nếu không chỉ định thì nó tự động tạo.
- hls_fragment 3s: Thực hiện tạo mỗi fragment với 03 second (fragment *.ts). Thường thì mỗi tệp ts được sinh ra gồm 3s + time decode)
- hls_nested on; Bật chế độ lồng. Dùng để tạo ra một subdirectory của “hls_path” cho mỗi stream. Playlist và fragments sẽ được tạo ra cùng thư mục đó. Ví dụ /tmp/hls/ stream-name. Mặc định chế độ này là off, vì vậy stream sẽ tạo ra playlist và fragments ở thư mục của của đường dẫn hls_path, với kiểu tên là stream-name-..ts và stream-name.m3u8
- hls_fragment_naming system: Tên của fragment, có thể định dạng với các kiểu “system, sequential, timestamp”
Step2: Tạo thư mục và copy tệp statistics dạng xml
mkdir /tmp/hls
chown -R nginx:nginx
copy /opt/nginx/nginx-rtmp-module/stat.xsl /var/www/html
systemctl restart nginx
Step3: Tạo tệp tin index.html
Chúng ta thực hiện tạo tệp tin tĩnh index.html để tạo web player cho xem live streaming qua web browser
<!DOCTYPE html>
<html>
<head>
<meta charset=utf-8 />
<title>Videojs-HLS embed</title>

  <!--

  Uses the latest versions of video.js and videojs-http-streaming.

  To use specific versions, please change the URLs to the form:

  <link href="https://unpkg.com/[email protected]/dist/video-js.css" rel="stylesheet">
  <script src="https://unpkg.com/[email protected]/dist/video.js"></script>
  <script src="https://unpkg.com/@videojs/[email protected]/dist/videojs-http-streaming.js"></script>

  -->

  <link href="https://unpkg.com/video.js/dist/video-js.css" rel="stylesheet">
<style>
.center {
    margin-left: auto;
    margin-right: auto;
    display: block
}
</style>
</head>
<body>
<!--  <h1>Video.js Example Embed</h1> -->

  <video-js id="my_video_1" class="vjs-default-skin center" controls preload="auto" width="720" height="400" poster="../images/bbb-poster.jpg">
    <source src="http://192.168.10.113/hls/stream/index.m3u8" type="application/x-mpegURL">
  </video-js>

  <script src="https://unpkg.com/video.js/dist/video.js"></script>
  <script src="https://unpkg.com/@videojs/http-streaming/dist/videojs-http-streaming.js"></script>

  <script>
    var player = videojs('my_video_1');
  </script>

</body>
</html>
Note: Thay đường dẫn http://192.168.10.113/hls/stream/index.m3u8 với đường dẫn chứa thông tin tệp stream phù hợp.
5.2 Thực hiện live streaming từ mobile
Sử dụng một phần mềm live streaming bất kỳ, hỗ trợ giao thức RTMP. Ở đây, tôi sử dụng android nên cài đặt soft Larix Broadcaster
- Mở Larix Broadcaster → Nhấn biểu tượng Setting → Connections → Sau đó vào các thông tin kết nối đến Live Streaming server.
rtmp://192.168.10.113:1935/live/stream
(Với tên “stream” là tên bất kỳ do mình đặt. Tên này sau khi lên live server, tương ứng với biến $name)
- Cuối cùng nhấn vào biểu tượng quay phát để live streaming thôi
5.3 Kiểm tra quá trình Live Streaming
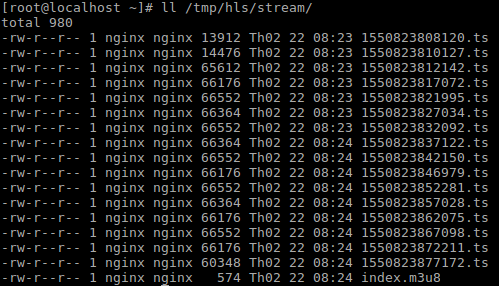
Step1: Xem thông tin tệp streaming trên server
Dùng lệnh để list xem quá trình sinh ra luồng stream với tệp playlist và fragments
Step2: Thực hiện xem live stream qua web browser
Mở web browser và truy cập http://192.168.10.113/ để xem live streaming

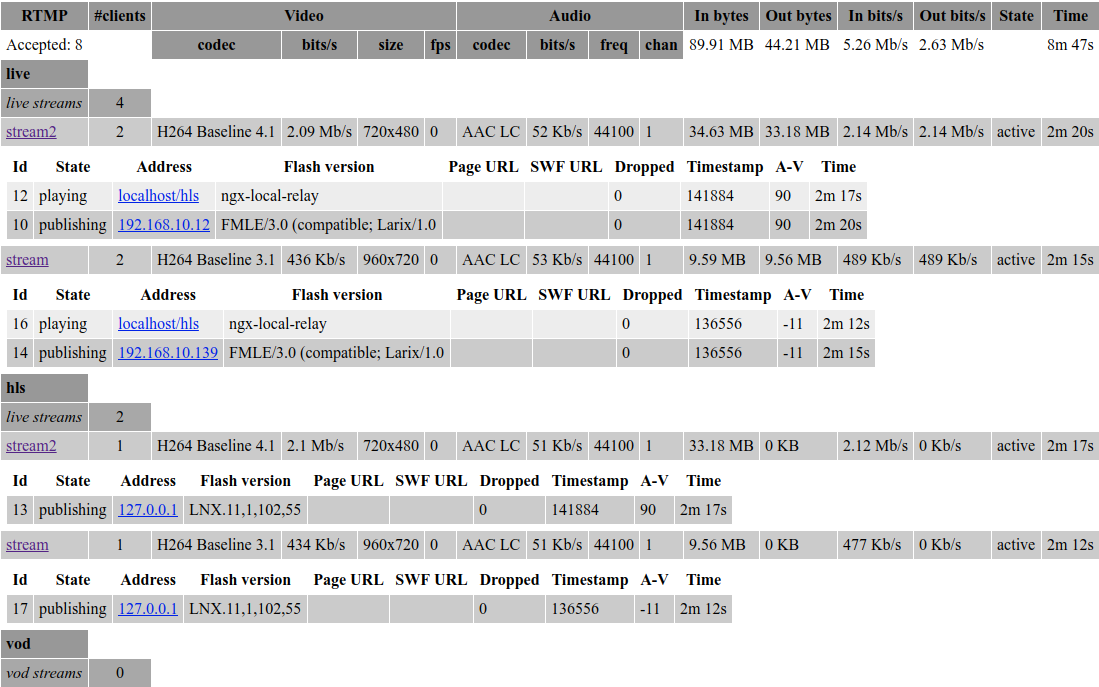
Step3: Xem thống kê số liệu streaming
Truy cập http://192.168.10.113/stat
TopDev via Github
- V Vì sao lập trình viên BE cần phải biết Figma?
- N Nên học Front-end hay Back-end trước?
- H Học back end cần học những gì? Lộ trình cho người mới bắt đầu
- T Tầm quan trọng của Loose Coupling trong hệ thống Backend
- L Lập trình Web nên học ngôn ngữ nào là phù hợp?
- N Nên học Front-end hay Back-end? Sự khác biệt là gì?
- P Phân biệt Front End và Back End, điểm khác nhau là gì?
- T Top 7 câu hỏi phỏng vấn Backend Developer
- L Lộ trình học MySQL từ A đến Z
- Q Quản lý realm database theo hướng micro-service trong iOS