Trong demo chúng ta sẽ sử dụng
- Create React App
- Glamor
- React Router
- Amazon Cognito để authentication
- AWS amplify để tương tác với AWS Services
Setup
Khởi tạo project và các thư viện sẽ sử dụng
create-react-app react-auth
cd react-auth

npm i react-router-dom glamor --save
Cài AWSMobile CLI
npm i -g awsmobile-cli
Khởi tạo config AWS IAM
awsmobile configure
awsmobile init
Nó sẽ tạo project Mobile Hub và file aws-exports.js trong thư mục src. Tiếp theo, thêm user-signin và deploy các config mới
awsmobile user-signin enable
awsmobile push
awsmobile user-signin enable sẽ bật Amazon Congito trong project với các thiết đặt mặc định, bao gồm 2 factor authentication với SMS (sẽ thêm TOTP sau). Nếu muôn can thiệp các thiệt đặt, vào trực tiếp Amazon Cognito để chỉnh
Màn hình đăng ký

Để tương tác với Amazon Cognito, chúng ta sẽ sử các hàm trong class Auth từ thư viện aws-amplify:
signUp – tạo user mới
signUp(username: string, password: string, attributes?: object)
confirmSignUp – để xác nhận đăng ký thành công
confirmSignUp(username: string, authenticationCode: string)
signIn – đăng nhập
signIn(username: string, password: string)
confirmSignIn – xác nhận đăng nhập
confirmSignIn(user: object, authenticationCode: string)
Trong file root của project, thường là index.js
// một số import khác
//
import config from './aws-exports'
import Amplify from 'aws-amplify'

Amplify.configure(config)

ReactDOM.render(<App />, document.getElementById('root'))
registerServiceWorker();
Screen SignUp.js
import React from 'react'
import { css } from 'glamor'

class SignUp extends React.Component {
  state = {
    username: '',
    password: '',
    email: '',
    phone_number: '',
    authCode: ''
  }
  render() {
    return (
      <div {...css(styles.container)}>
        <h2>SignUp</h2>
      </div>
    )
  }
}
const styles = {
  container: {
    display: 'flex',
    flexDirection: 'column',
    alignItems: 'center'
  }
}
Flow sẽ như thế này, sau khi user cung cấp các thông tin trong form signup, chúng ta gọi đến phương thức signUp, user sẽ nhận được một mã code để verify quá SMS, user điền mã code này vào form verify, chúng ta verify cái mã code này bằng phương thức ‘confirmSignUp’
import React from 'react'
import { css } from 'glamor'

class SignUp extends React.Component {
  state = {
    username: '',
    password: '',
    email: '',
    phone_number: '',
    authCode: ''
  }
  onChange = (key, value) => {
    this.setState({ [key]: value })
  }
  render() {
    return (
      <div {...css(styles.container)}>
        <h2>Sign Up</h2>
        <input
          {...css(styles.input)}
          placeholder='Username'
          onChange={evt => this.onChange('username', evt.target.value)}
        />
        <input
          {...css(styles.input)}
          placeholder='Password'
          type='password'
          onChange={evt => this.onChange('password', evt.target.value)}
        />
        <input
          {...css(styles.input)}
          placeholder='Email'
          onChange={evt => this.onChange('email', evt.target.value)}
        />
        <input
          {...css(styles.input)}
          placeholder='Phone Number'
          onChange={evt => this.onChange('phone_number', evt.target.value)}
        />
        <div {...css(styles.button)}>
          <span>Sign Up</span>
        </div>

        <input
          {...css(styles.input)}
          placeholder='Authentication Code'
          onChange={evt => this.onChange('authCode', evt.target.value)}
        />
        <div {...css(styles.button)}>
          <span>Confirm Sign Up</span>
        </div>

      </div>
    )
  }
}

let styles = {
  container: {
    display: 'flex',
    flexDirection: 'column',
    alignItems: 'center'
  },
  button: {
    width: '170px',
    padding: '10px 0px',
    backgroundColor: '#ddd',
    cursor: 'pointer',
    borderRadius: '3px',
    ':hover': {
      backgroundColor: '#ededed'
    }
  },
  input: {
    height: 40,
    marginBottom: '10px',
    border: 'none',
    outline: 'none',
    borderBottom: '2px solid #4CAF50',
    fontSize: '16px',
    '::placeholder': {
      color: 'rgba(0, 0, 0, .3)'
    }
  }
}

export default SignUp
Xong cái UI, giờ ta sử dụng 2 phương thức class Auth
// previous imports omitted

  import { Auth } from 'aws-amplify'

  // previously shown code omitted
  signUp = () => {
    const { username, password, email, phone_number } = this.state
    Auth.signUp({
      username,
      password,
      attributes: {
        email,
        phone_number
      }
    })
    .then(() => console.log('successful sign up!'))
    .catch(err => console.log('error signing up: ', err))
  }
  confirmSignUp = () => {
    Auth.confirmSignUp(this.state.username, this.state.authCode)
    .then(console.log('successful confirm sign up!'))
    .catch(err => console.log('error confirming signing up: ', err))
  }
  render() {
    //
    // here we need to update the buttons to attach class methods to onClick event
    <div {...css(styles.button)} onClick={this.signUp}>
      <span>Sign Up</span>
    </div>

    <input
      {...css(styles.input)}
      placeholder='Authentication Code'
      onChange={evt => this.onChange('authCode', evt.target.value)}
    />
    <div {...css(styles.button)} onClick={this.confirmSignUp}>
      <span>Confirm Sign Up</span>
    </div>
  }
Cuối cùng import và sử dụng component trong App.js
import React, { Component } from 'react';
import logo from './logo.svg';
import './App.css';

import SignUp from './SignUp'

class App extends Component {
  render() {
    return (
      <div className="App">
        <header className="App-header">
          <img src={logo} className="App-logo" alt="logo" />
          <h1 className="App-title">Welcome to React</h1>
        </header>
        <SignUp />
      </div>
    );
  }
}

export default App;
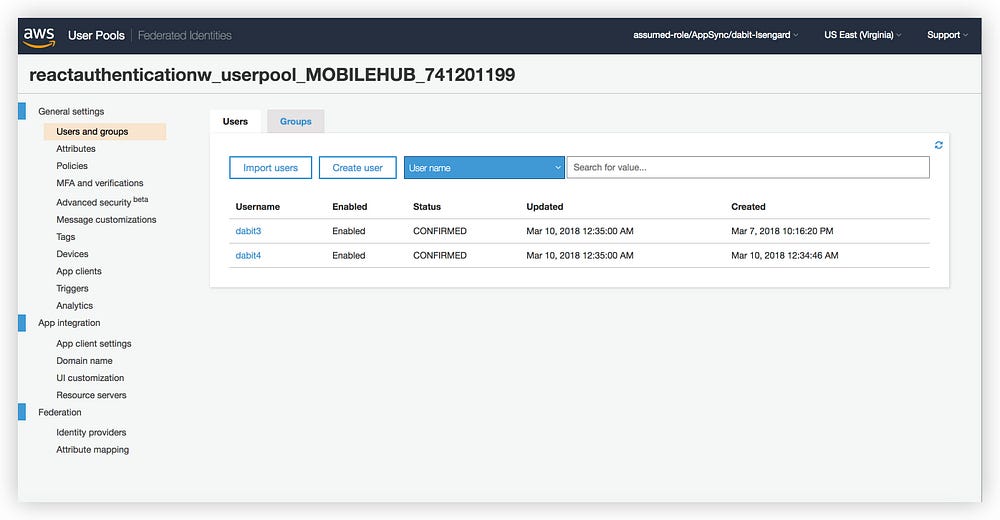
Các thông tin của user sẽ được lại trong ‘Manage your User Pools’, vào Amazon Coginito dashboard, chọn ứng dụng đã setup, chọn mục ‘Users and Settings’
Sign In
Sign in thì cũng tương tự như signup, chúng ta sử dụng Auth.signIn(username, password), trả về object nếu thành công, sau đó nó sẽ gửi SMS tới user với code xác nhận lần nữa, verify bằng confirmSignIn
signIn() {
  Auth.signIn(this.state.username, this.state.password)
    .then(user => this.setState({ user }))
    .catch(err => console.log('error signing in! :', err))
}
confirmSignIn() {
  Auth.confirmSignIn(this.state.user, this.state.authCode)
    .then(userData => {
      console.log('userdata: ', userData)
    })
    .catch(err => console.log('error confirming sign in!: ', err))
}
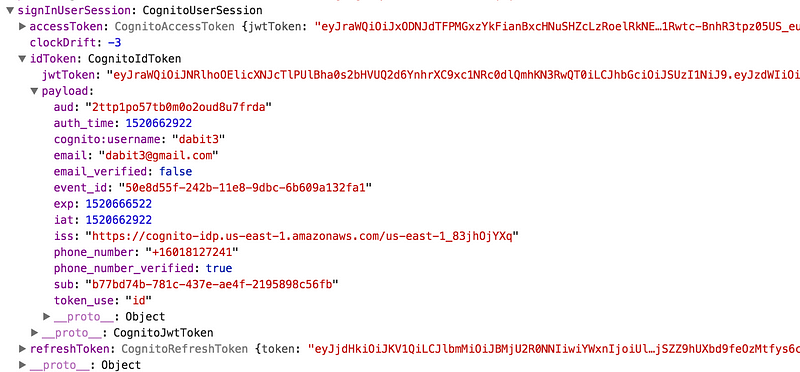
User data nằm trong cục dữ liệu trả về sau khi gọi hàm confirmSignIn
Có rất nhiều cách để lấy thông tin user đang đăng nhập, có thể dùng Auth.currentAuthenticatedUser() là dễ nhất, toàn bộ API có thể tham khảo ở đây
Kết thúc phần 1 ở đây, phần 2 tiếp tục với Routing và TOTP để có thể làm Google Authenticator.
Bài viết gốc được đăng tải tại Vuilaptrinh
Xem thêm các vị trí công việc ngành it tại Topdev.vn