Docker to Serverless (Google Cloud Platform)
Bài viết được sự cho phép của tác giả Nguyễn Hữu Đồng
Hi xin chào các bạn sau chuỗi ngày dài trốn dịch thì mình đã quay trở lại, chợ bị yêu cầu đống cửa, chả buôn bán được gì nên mình lại có thời gian rảnh để mà vọc vạch, tình cờ nghe ông anh nói qua serverless đồ các kiểu thì mình cũng thấy hứng thú, trong bài viết này mình sẽ chia sẻ những thứ mà mình đã vọc vạch trong ngày vừa qua.
Deploy application từ docker image
Ý tưởng đơn giản là bạn sẽ đống gói ứng dụng thành docker image rồi upload lên docker image repository nào đó như gcloud container registry sau đó sử dụng một dịch vụ hỗ trợ chạy container từ docker image như google cloud run.
Không auto Deploy khi push code lên GitHub(auto Deploy nằm ở phần dưới)
- Build ứng dụng ra
Docker Image
Trong ví dụ này mình sẽ dùng blog của mình làm ví dụ. Project này sử dụng nextjs, mỗi khi mình viết một bài mới thì mình sẽ build code rồi export ra static file, mình không cần phải làm phức tạp, vì với blog này chỉ cần static file là đủ.
git clone https://github.com/dongnguyenltqb/dongnguyen.dev.git
cd dongnguyen.dev
yarn install# Để build project
yarn build
# Để export ra static file
yarn export
Và sau khi export thì mình có toàn bộ static file trong thư mục out
➜  dongnguyen.dev git:(master) ✗ ll
total 864
-rw-r--r--    1 gopher  staff    25B Apr  4 23:57 404.html
-rw-r--r--    1 gopher  staff   155B Apr  5 11:41 Dockerfile
-rw-r--r--    1 gopher  staff   1.1K Mar 14 13:29 LICENSE
-rw-r--r--    1 gopher  staff   870B Apr  5 11:45 cloudbuild.yaml
-rw-r--r--    1 gopher  staff   667B Mar 14 13:29 next.config.js
-rw-r--r--    1 gopher  staff   174B Apr  4 23:57 nginx.conf
drwxr-xr-x  854 gopher  staff    27K Apr  4 20:13 node_modules
drwxr-xr-x   44 gopher  staff   1.4K Apr  4 20:15 out
-rw-r--r--    1 gopher  staff   1.5K Apr  4 20:12 package.json
-rw-r--r--    1 gopher  staff   506B Mar 14 13:29 postcss.config.js
drwxr-xr-x   37 gopher  staff   1.2K Mar 16 10:02 public
drwxr-xr-x    8 gopher  staff   256B Mar 16 10:02 src
-rw-r--r--    1 gopher  staff   867B Mar 14 13:29 tailwind.config.js
-rw-r--r--    1 gopher  staff   394K Apr  4 20:12 yarn.lock
➜  dongnguyen.dev git:(master) ✗
Các bạn để ý thì thấy mình có sử dụng nginx để serve static file
Nginx sẽ lắng nghe request, dựa vào path mà xem có file nào match không, không thì nó sẽ gửi file index.htmlvà nếu không thấy fileindex.html nữa thì trả về 404
server {
    listen 80;
    listen [::]:80;root /usr/share/nginx/html;
    error_page 404 /404.html;location / {
        try_files $uri /index.html =404;
    }
}
Và đây là nội dung của Dockerfile
FROM nginx:1.14WORKDIR /usr/share/nginx/htmlCOPY out  /usr/share/nginx/html/
COPY 404.html .
COPY nginx.conf /etc/nginx/conf.d/default.confEXPOSE 80
Khi build image thì mình sẽ copy tất cả file trong thư mục out vào /usr/share/nginx/html/ Sau đó copy file nginx.conf vào /etc/nginx/conf.d/default.conf để nginx dùng cho việc tạo server serve static file.
➜  dongnguyen.dev git:(master) ✗ sudo docker build .
Password:
Sending build context to Docker daemon    312MB
Step 1/6 : FROM nginx:1.14
 ---> 295c7be07902
Step 2/6 : WORKDIR /usr/share/nginx/html
 ---> Running in b3833b65516a
Removing intermediate container b3833b65516a
 ---> 88cb20f7c71e
Step 3/6 : COPY out  /usr/share/nginx/html/
 ---> 6baffa267a2e
Step 4/6 : COPY 404.html .
 ---> ccc50836cbf4
Step 5/6 : COPY nginx.conf /etc/nginx/conf.d/default.conf
 ---> af5a5d05ce44
Step 6/6 : EXPOSE 80
 ---> Running in d5c64c94d39e
Removing intermediate container d5c64c94d39e
 ---> 45bbe32cd01c
Successfully built 45bbe32cd01c
➜  dongnguyen.dev git:(master) ✗
Kết quả image nặng 138MB
➜  dongnguyen.dev git:(master) ✗ docker image ls
REPOSITORY   TAG     IMAGE ID     CREATED            SIZE
<none>       <none>  45bbe32cd01c  32 seconds ago      138MB
2. Đưa image lên Google Container Registry
container registry là nơi mà ta sẽ lưu trữ image, để push được image lên đây thì docker của các bạn cần phải được config để có quyền. Ở đây mình dùng gcloud cli để cấp quyền cho docker và nếu các bạn chưa cài gcloud cli thì có thể xem hướng dẫn cài đặt, cài đặt tài khoản cho cli tại đây.
➜  dongnguyen.dev git:(master) ✗ sudo gcloud auth configure-docker
Password:
WARNING: Your config file at [/Users/gopher/.docker/config.json] contains these credential helper entries:{
  "credHelpers": {
    "asia.gcr.io": "gcloud",
    "staging-k8s.gcr.io": "gcloud",
    "us.gcr.io": "gcloud",
    "gcr.io": "gcloud",
    "marketplace.gcr.io": "gcloud",
    "eu.gcr.io": "gcloud"
  }
}
Adding credentials for all GCR repositories.
WARNING: A long list of credential helpers may cause delays running 'docker build'. We recommend passing the registry name to configure only the registry you are using.
gcloud credential helpers already registered correctly.Updates are available for some Cloud SDK components.  To install them,
please run:
  $ gcloud components update➜  dongnguyen.dev git:(master) ✗
Vậy là xong việc cấp quyền, việc tiếp theo là đánh tag cho nó và upload lên.
➜  dongnguyen.dev git:(master) ✗ sudo docker push asia.gcr.io/tough-racer-272817/blog:v0.69
The push refers to repository [asia.gcr.io/tough-racer-272817/blog]
518883fbeafc: Pushed
39fdf81e18fd: Pushed
070d58aabef7: Pushed
82ae01d5004e: Layer already exists
b8f18c3b860b: Layer already exists
5dacd731af1b: Layer already exists
v0.69: digest: sha256:965753d697100fa539efaf0730de6856db0d52a0f3db7557a87a18f5467f7fcd size: 1573
➜  dongnguyen.dev git:(master) ✗
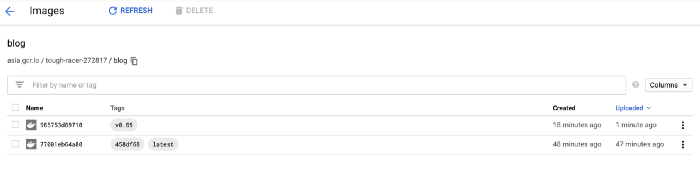
Và ở trên container registry
Và để deploy lên cloud run các bạn chỉ cần
sudo gcloud \
beta \
run \
deploy \
--region asia-east1 \
--image asia.gcr.io/tough-racer-272817/blog:v0.69 \
--max-instances 1 \
--platform managed \
--port 80 \
--allow-unauthenticated \
blog
Kết quả
➜  dongnguyen.dev git:(master) ✗

Deploying container to Cloud Run service [blog] in project [tough-racer-272817] region [asia-east1]
✓ Deploying... Done.
  ✓ Creating Revision...
  ✓ Routing traffic...
  ✓ Setting IAM Policy...
Done.
Service [blog] revision [blog-00014-dax] has been deployed and is serving 100 percent of traffic at https://blog-k3ndrinnqq-de.a.run.app
➜  dongnguyen.dev git:(master) ✗
Và xong ứng dụng của mình đã được deploy tại https://blog-k3ndrinnqq-de.a.run.app
Auto deploy khi push code lên GitHub
Để tự động hóa quá trình build và deploy thì mình dùng đến dịch vụ google cloud build, trình tự sẽ như thế này, kết nối GitHub repository với cloud build, tạo một triggerđến một event từ githubví dụ như là khi push to a branch, push new tag
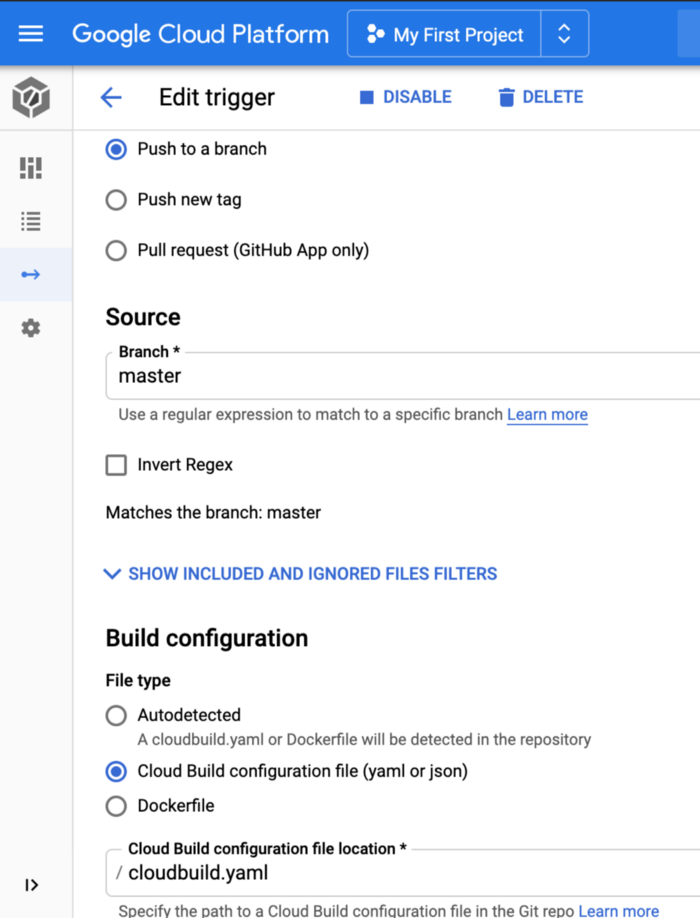
Ví dụ như trong hình mình setup một trigger cứ mỗi khi mình push code lên branch master thì cloud buildsẽ tiến hành làm những công việc mình đã định nghĩa trong file cloudbuild.yaml
Sau khi tạo xong trigger

Nội dung file cloudbuild.yamltrong gitHub repository
steps:
- name: 'gcr.io/cloud-builders/docker'
  args: ['build', '-t', 'asia.gcr.io/tough-racer-272817/blog:$SHORT_SHA', '.']
- name: 'gcr.io/cloud-builders/docker'
  args: ['push', 'asia.gcr.io/tough-racer-272817/blog:$SHORT_SHA']
- name: 'gcr.io/cloud-builders/docker'
  args: ['tag', 'asia.gcr.io/tough-racer-272817/blog:$SHORT_SHA', 'asia.gcr.io/tough-racer-272817/blog:latest']
- name: 'gcr.io/cloud-builders/docker'
  args: ['push', 'asia.gcr.io/tough-racer-272817/blog:latest']
- name: 'gcr.io/cloud-builders/gcloud'
  args:
    - beta
    - run
    - deploy
    - --region=asia-east1
    - --image=asia.gcr.io/tough-racer-272817/blog:latest
    - --cpu=1
    - --memory=128Mi
    - --max-instances=1
    - --platform=managed
    - --port=80
    - --concurrency=100
    - --allow-unauthenticated
    - blog
images:
  - 'asia.gcr.io/tough-racer-272817/blog:latest'
Trình tự các bước mà cloud run sẽ làm
- Build
imagevà đánhtagcho nó. - Đẩy
imageđã build lêncontainer registry - Đánh thêm tag
latestnữa choimage - Đẩy
imagevới taglatestlêncontainer registry - Chạy lệnh để
deploylêncloud runvớiimagecó taglatest
Nhưng trước tiên, bạn phải setup kết nối gitHub repository và cấp quyền cho cloud build với thêm hai role Cloud Run Admin vàCloud Run Service Agent là trong cài đăt IAM

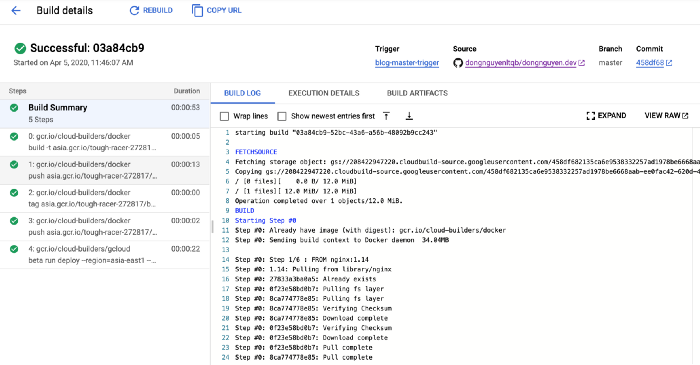
Và bây giờ mọi thứ đã có thể diễn ra tự động rồi, mình sẽ commit code và push lên branch master, và đây là kết quả
Thực ra thì cái gì cũng có hạn chế, serverless (Google cloud Platform) cũng vậy, đây là một vài issue đang tồn tại của Cloud Run nhưng so với nhau cầu serve static file hay là host một web api của mình thì cái này cũng đủ rồi.
Bài viết gốc được đăng tải tại medium.com
Có thể bạn quan tâm:
- Công nghệ Cloud: Bối cảnh sử dụng Cloud & kinh nghiệm làm việc với AWS, IaC
- 6 lý do khiến cho nền tảng kết nối (plaform) thất bại – Dành cho các founder đang xây dựng platform
- Làm quen với kiến trúc Serverless
Xem thêm các việc làm Developer hấp dẫn tại TopDev
- M Martech là gì? Tại sao học ngành marketing nên biết?
- S So sánh chi tiết iOS 18 vs iOS 26: Cuộc cách mạng trên iPhone chỉ sau 1 năm
- B BenQ RD Series – Dòng Màn Hình Lập Trình 4k+ Đầu Tiên Trên Thế Giới
- i iOS 18 có gì mới? Có nên cập nhật iOS 18 cho iPhone của bạn?
- G Gamma AI là gì? Cách tạo slide chuyên nghiệp chỉ trong vài phút
- P Power BI là gì? Vì sao doanh nghiệp nên sử dụng PBI?
- K KICC HCMC x TOPDEV – Bước đệm nâng tầm sự nghiệp cho nhân tài IT Việt Nam
- T Trello là gì? Cách sử dụng Trello để quản lý công việc
- T TOP 10 SỰ KIỆN CÔNG NGHỆ THƯỜNG NIÊN KHÔNG NÊN BỎ LỠ
- T Tìm hiểu Laptop AI – So sánh Laptop AI với Laptop thường