Bài viết được sự cho phép của tác giả Nguyễn Hữu Khanh
Thông thường, chúng ta sẽ không sử dụng trang login mặc định của Spring Security cho các ứng dụng được deploy lên production, nguyên nhân vì sao các bạn cũng có thể đoán được đúng không? Trang login mặc định này để chúng ta learning là chủ yếu. Vậy để thay thế trang login mặc định này, chúng ta sẽ làm như thế nào? Trong bài viết này, mình sẽ hướng dẫn các bạn làm điều này.
Xem thêm Việc làm IT hấp dẫn trên TopDev
Đầu tiên, mình sẽ tạo mới một Spring Boot với Spring Security, Spring Web và Thymeleaf dependencies.
Kết quả như sau:
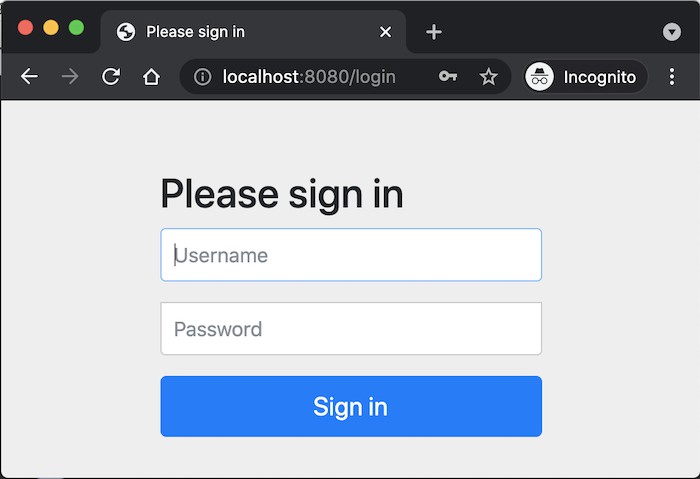
Chạy ví dụ này, các bạn sẽ thấy trang login mặc định của Spring Security như sau:
Bây giờ, mình sẽ sử dụng Bootstrap để viết custom login page.
Mình sẽ sử dụng WebJars để quản lý thư viện Bootstrap:
<dependency>
<groupId>org.webjars</groupId>
<artifactId>webjars-locator-core</artifactId>
</dependency>
<dependency>
<groupId>org.webjars</groupId>
<artifactId>bootstrap</artifactId>
<version>5.0.1</version>
</dependency>
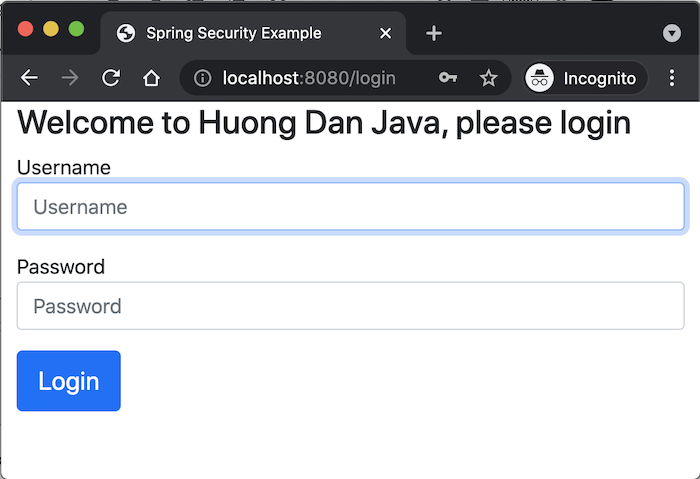
Để đơn giản, custom page login của mình có các thành phần cũng giống như trang login mặc định của Spring Security, chỉ khác biệt là mình thay thế chữ “Please sign in” bằng dòng chữ “Welcome to Huong Dan Java, please login in” và nút “Sign in” giờ là “Login”.
Code trang login.html nằm trong thư mục src/main/resources/templates của mình với Bootstrap như sau:
<!DOCTYPE html>
<html lang="en" xmlns:th="http://www.thymeleaf.org">
<head>
<meta charset="utf-8">
<meta name="viewport" content="width=device-width, initial-scale=1, shrink-to-fit=no">
<meta name="description" content="">
<meta name="author" content="">
<title>Spring Security Example</title>
<link href="/webjars/bootstrap/css/bootstrap.min.css" rel="stylesheet">
</head>
<body>
<div class="container">
<h2 class="form-signin-heading">Welcome to Huong Dan Java, please login</h2>
<div th:if="${param.error}" class="alert alert-danger">
Invalid username and password.
</div>
<div th:if="${param.logout}" class="alert alert-success">
You have been logged out.
</div>
<form class="form-signin" method="POST" th:action="@{/login}">
<p>
<label for="username" class="sr-only">Username</label>
<input type="text" id="username" name="username" class="form-control"
placeholder="Username" required autofocus>
</p>
<p>
<label for="password" class="sr-only">Password</label>
<input type="password" id="password" name="password" class="form-control"
placeholder="Password" required>
</p>
<button class="btn btn-lg btn-primary btn-block" type="submit">Login</button>
</form>
</div>
</body>
</html>
Ngoài ra mình cũng expose một trang khác, chỉ đơn giản để hiển thị trang home sau khi login mà thôi:
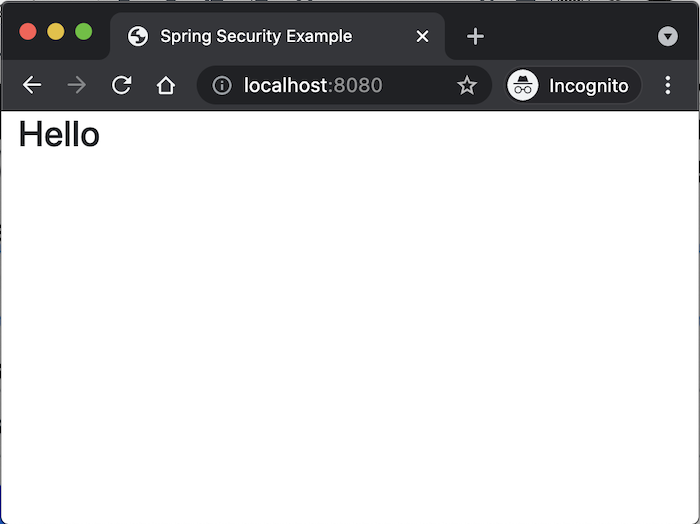
<!DOCTYPE html>
<html lang="en" xmlns:th="http://www.thymeleaf.org">
<head>
<meta charset="utf-8">
<meta name="viewport" content="width=device-width, initial-scale=1, shrink-to-fit=no">
<meta name="description" content="">
<meta name="author" content="">
<title>Spring Security Example</title>
<link href="/webjars/bootstrap/css/bootstrap.min.css" rel="stylesheet">
</head>
<body>
<div class="container">
<h2 class="form-signin-heading">Hello</h2>
</div>
</body>
</html>
Các bạn đọc thêm cách sử dụng Thymeleaf trong Spring Boot để hiểu tại sao mình để tập tin login.html trong thư mục src/main/resources/templates nhé!
Giờ mình sẽ tạo mới một controller để expose các trang này:
package com.huongdanjava.springsecurity;

import org.springframework.stereotype.Controller;
import org.springframework.web.bind.annotation.GetMapping;

@Controller
public class ApplicationController {

@GetMapping("/login")
public String viewLoginPage() {
return "login";
}

@GetMapping("/")
public String hello() {
return "home";
}
}
Sau khi đã expose trang custom login xong, giờ là lúc chúng ta sẽ cấu hình Spring Security để sử dụng trang custom này.
Các bạn cần override lại phương thức configure(HttpSecurity http) để làm việc này:
package com.huongdanjava.springsecurity;

import org.springframework.security.config.annotation.web.builders.HttpSecurity;
import org.springframework.security.config.annotation.web.configuration.EnableWebSecurity;
import org.springframework.security.config.annotation.web.configuration.WebSecurityConfigurerAdapter;

@EnableWebSecurity
public class SpringSecurityConfiguration extends WebSecurityConfigurerAdapter {

@Override
protected void configure(HttpSecurity http) throws Exception {
super.configure(http);
}

}
Chúng ta sẽ cấu hình tất cả các request phải authenticated và sử dụng trang login custom của chúng ta như sau:
package com.huongdanjava.springsecurity;

import org.springframework.security.config.annotation.web.builders.HttpSecurity;
import org.springframework.security.config.annotation.web.builders.WebSecurity;
import org.springframework.security.config.annotation.web.configuration.EnableWebSecurity;
import org.springframework.security.config.annotation.web.configuration.WebSecurityConfigurerAdapter;

@EnableWebSecurity
public class SpringSecurityConfiguration extends WebSecurityConfigurerAdapter {

@Override
protected void configure(HttpSecurity http) throws Exception {
http.authorizeRequests()
.anyRequest().authenticated()
.and()
.formLogin()
.loginPage("/login")
.permitAll();
}

@Override
public void configure(WebSecurity web) throws Exception {
web.ignoring().antMatchers("/webjars/**");
}
}
Như các bạn thấy, từ đối tượng HttpSecurity, chúng ta sẽ gọi phương thức formLogin() để lấy về đối tượng FormLoginConfigurer để cấu hình cho trang login của Spring Security. Từ đối tượng FormLoginConfigurer này, chúng ta sẽ sử dụng phương thức loginPage() với tham số là tên của login page để để override lại trang login mặc định của Spring Security.
Mình cũng cấu hình thêm configure(WebSecurity web) để ignore security cho các đường dẫn liên quan đến WebJars, ở đây là đường dẫn đến Bootstrap CSS.
OK, đến đây thì các bạn có thể chạy lại ứng dụng để kiểm tra kết quả.
Trang login của mình giờ sẽ như sau:
Đăng nhập với username là user và password được generated, các bạn sẽ thấy kết quả như sau: